If your Keurig coffee pot is not brewing, the fix is usually simple: a clogged needle, a misaligned water reservoir, or mineral scale buildup from hard water. In most cases, you can resolve the issue in under 15 minutes without calling customer support or buying a new machine.
You pressed the button. You heard… nothing. No hum, no drip, no blessed stream of coffee filling your mug. Whether your Keurig is completely silent, flashing a confusing light, or just pumping without producing any coffee — you’re in the right place. Let’s walk through every cause and every fix, starting with the easiest and working toward the more involved solutions.
- Mineral scale buildup is responsible for the majority of Keurig brewing failures, particularly in households with hard tap water — yet fewer than 30% of Keurig users descale on the recommended schedule.
- A misaligned or improperly seated water reservoir is the fastest fix in the book and resolves the problem instantly in a significant share of “won’t brew” cases.
- Needle clogs from coffee grounds take less than five minutes to clear with a straightened paper clip — and they’re one of the most overlooked causes of incomplete brews.
- A full factory reset clears software glitches and often restores brewing immediately, with no physical intervention required at all.
Why Is My Keurig Coffee Pot Not Brewing?
Keurig machines are built for simplicity — pod in, button pressed, coffee out. But that simplicity comes with a trade-off: when something goes wrong, it’s not always obvious why. According to Keurig’s official support documentation, the most common reasons a Keurig stops brewing fall into five categories: water supply problems, scale buildup, needle clogs, software glitches, and hardware failure.
Here’s the encouraging part: the first four categories cover roughly 90% of all “not brewing” complaints. True hardware failure — meaning something physically broken beyond repair — is actually rare in machines under five years old. So before you write off your Keurig, work through each category systematically. Chances are very good you’ll have it brewing again before you finish your first cup of backup instant coffee.
It’s also helpful to know which model you own. Older machines like the K-Classic and K-Elite behave differently from newer touchscreen models like the K-Supreme Plus or K-Café. Reset procedures and error indicators vary by model, so keep your machine’s generation in mind as you troubleshoot.
Is Your Water Reservoir the Problem?
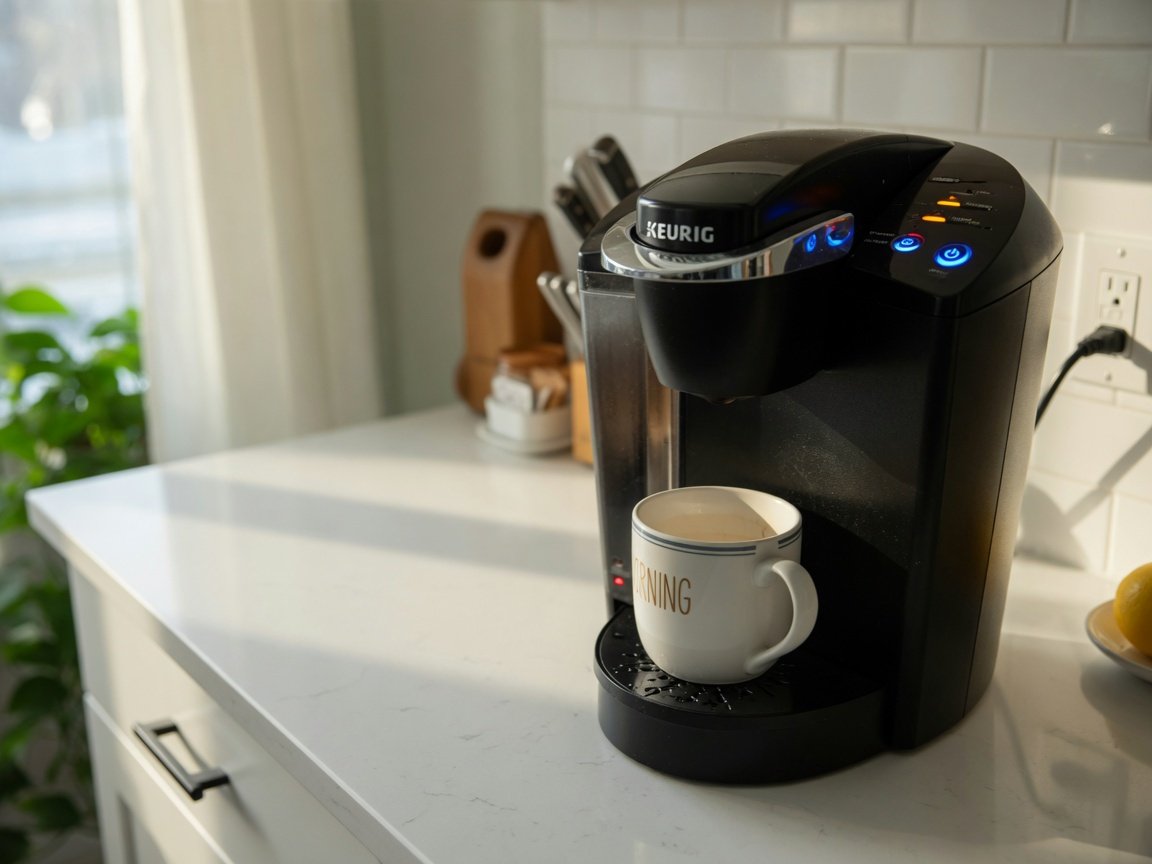
This is always the first place to look — and it’s surprising how often it’s the culprit. Your Keurig’s water reservoir needs to be properly seated, filled above the minimum fill line, and free from cracks or internal debris. If any of these conditions aren’t met, your machine will refuse to brew, no matter how many times you press the button.
Start by removing the reservoir completely. Look inside. Is there a slimy film, visible mold, or chalky white residue coating the walls? That’s biofilm and mineral deposit buildup, and it can interfere with the water intake valve at the reservoir’s base. Appliance care experts recommend cleaning the water reservoir at least once a week with warm, soapy water — not just rinsing it out between refills.
Once it’s clean, refill it with fresh cold water. Keurig specifically recommends using filtered or bottled water to slow mineral accumulation, especially if your tap water is high in calcium or magnesium. Understanding how water quality and temperature affect your coffee’s flavor can also help you get a noticeably better cup once your machine is back in action.
Reseat the reservoir firmly until you feel it click into place. Many Keurig models use a magnetic connection point at the base — if it’s even slightly off, the machine detects no water source and simply won’t attempt to brew. After reseating, try a brew cycle with just water and no K-Cup to confirm water flow has been restored before you load in a pod.
The #1 Culprit: Mineral Scale Buildup and How to Descale
If your reservoir is fine but your Keurig still won’t brew, scale buildup is the next most likely cause — and the single most overlooked maintenance issue in pod coffee makers. Scale, also called limescale, is a chalky white deposit left behind when hard water evaporates inside the machine. Over time, it coats the internal tubing, heating element, and pump, restricting water flow until brewing becomes impossible or severely limited.
Keurig recommends descaling every three months under normal use — and more frequently if you live in a hard water area. Machines descaled on schedule routinely last significantly longer than those that are never cleaned. Yet appliance care surveys consistently show that fewer than 30% of Keurig users descale on time. This single lapse is the most common reason machines fail before their time.
Here’s how to descale your Keurig properly, step by step:
- Empty the water reservoir and remove any K-Cup or reusable pod from the machine.
- Pour one full bottle of Keurig Descaling Solution — or 16 oz of plain white vinegar as a budget-friendly alternative — into the reservoir.
- Fill the remainder of the reservoir with water, bringing it to the max fill line.
- Place a large mug on the drip tray. You’ll be running multiple brew cycles and discarding the liquid each time.
- Run a brew cycle without a K-Cup using the largest cup size setting. Pour out the mug contents and repeat.
- Continue until the “Add Water” indicator lights up — this signals that the descaling solution has passed through the entire internal system.
- Rinse the reservoir thoroughly, refill it with fresh water, and run at least 12 plain water brew cycles to flush out any remaining descaling solution before using the machine for coffee.
If your machine is severely scaled — especially if it hasn’t been descaled in over a year — run the full descaling process twice. Most Keurig machines that struggled to brew return to full function after a single thorough descaling cycle. It’s one of those fixes that feels too simple to work, until it does.
How to Clear a Clogged Keurig Needle
Every Keurig has two needles: an upper needle that punctures the foil top of the K-Cup and a lower needle that punctures the bottom. Coffee grounds, foil fragments, and dried coffee residue can block these needles over time, reducing or completely stopping water flow. This issue is especially common with reusable K-Cup pods, which leave more grounds behind than factory-sealed pods.
Cleaning the needle is one of the fastest Keurig fixes available — it takes about three minutes start to finish. Here’s exactly what to do:
- Unplug your Keurig before you touch the needle. It is sharp and can cause injury when the machine is powered on.
- Open the brew head and locate the upper needle. It sits inside the brew head assembly, pointing downward toward where the K-Cup sits.
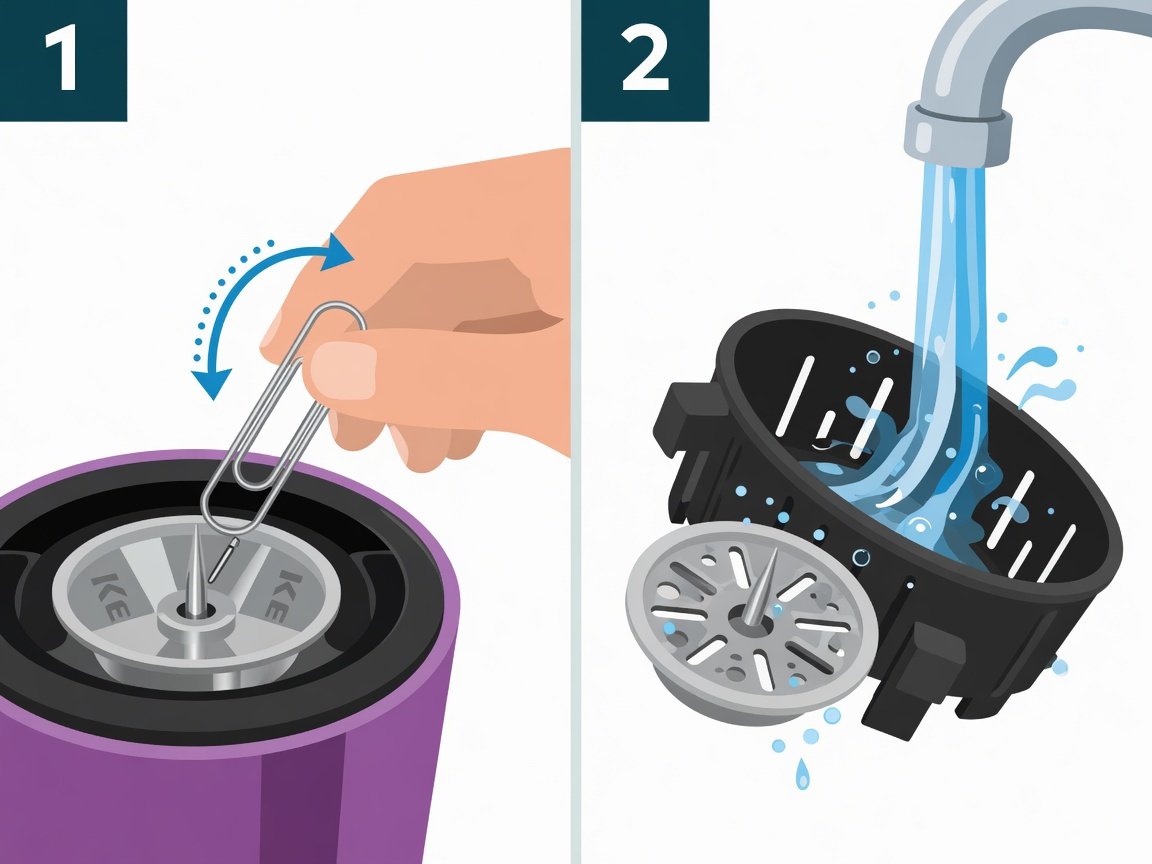
- Straighten a paper clip and gently insert it into the needle opening. Move it in small circular motions to dislodge any blockage — don’t push hard or you risk damaging the needle.
- For the lower needle, remove the K-Cup holder from the machine (it typically snaps out with light upward pressure). Use the paper clip to clear the exit needle at the bottom of the holder.
- Rinse the K-Cup holder under warm running water to flush out any remaining grounds or debris.
- Reassemble everything and plug the machine back in. Run a water-only brew cycle to confirm the clog is cleared before brewing with a pod.
Newer Keurig models ship with a dedicated needle-cleaning tool — a small orange funnel-shaped device. If you still have yours, fill it with water, insert it into the brew head, and open and close the handle several times. It flushes the needle far more effectively than a paper clip and is worth keeping nearby for routine maintenance.
Your Keurig Powers On But Won’t Brew — What’s Going On?
This is one of the most frustrating scenarios: all the lights are on, the machine appears fully ready, you press brew — and absolutely nothing happens. In most cases, the cause is either an air bubble trapped in the water line, the machine’s thermal protection shutting it down after overheating, or a brew button that isn’t making proper contact internally.
Air bubbles are more common than most people realize, particularly in new machines or ones that have just been descaled and refilled. Air gets trapped in the pump, and the pump spins without moving any water. The fix sounds almost too simple: fill the reservoir, then tilt the machine gently from side to side a few times and try brewing again. This dislodges the air bubble and allows the pump to prime correctly.
If overheating is the issue, your machine’s internal thermal cutoff has tripped as a safety measure — not a malfunction. Unplug the machine, let it cool for at least 30 minutes, then try again. Keeping your Keurig in a well-ventilated spot away from direct sunlight, toasters, and other heat-producing appliances helps prevent thermal shutoff from recurring.
Once you get your machine back to full working order, it’s worth investing a few minutes in the settings. Small adjustments to brew temperature, cup size, and water quality can make a surprisingly big difference — and there are some genuinely effective tricks covered in this guide on how to make your Keurig coffee taste noticeably better.
How to Reset Your Keurig (Step-by-Step)
When physical fixes don’t resolve the issue, a full reset often does. Keurig machines run on small internal computers, and like any device with firmware, they can develop software glitches that prevent normal operation. A reset clears these errors and restores the machine to its default factory state — often getting a completely unresponsive Keurig brewing again in under ten minutes.
The core reset process works on the vast majority of Keurig models:
- Press the power button to turn the machine off completely.
- Unplug the machine from the wall outlet and wait a full five minutes. This clears the machine’s capacitors and fully resets its internal memory — don’t shortcut this step.
- Remove the water reservoir completely while you’re waiting.
- Reattach the reservoir firmly, making sure it’s fully seated.
- Plug the machine back in and power it on. Wait for it to complete its full warm-up cycle before attempting a brew.
For a deeper factory reset on models like the K-Slim, K-Classic, or K-Elite, hold down the small, medium, and large cup size buttons simultaneously for five seconds while the machine is powered on. On touchscreen models, navigate to Settings → Maintenance → Factory Reset. The exact menu path varies slightly by model, but it’s never more than two or three levels deep.
If you find yourself seriously weighing whether to fix your Keurig or move on from pod brewing entirely, it’s a genuinely interesting comparison — how instant coffee actually stacks up against a Keurig in terms of cost, convenience, and flavor quality might surprise you either way.
Error Codes and Warning Lights: What They Mean
Keurig machines communicate problems through indicator lights and, on newer models, on-screen text messages. Knowing what these signals mean cuts troubleshooting time significantly — instead of guessing, you know exactly where to start. Here’s a quick reference for the most common indicators:
| Signal | What It Means | Quick Fix |
|---|---|---|
| Descale light (solid) | Mineral buildup is restricting internal water flow | Run a full descaling cycle immediately |
| Add Water light (reservoir is full) | Reservoir not properly seated or float valve stuck | Remove and firmly reseat reservoir; gently tap to free float |
| Brew button flashing | Machine is still heating up or is in a soft error state | Wait for full warm-up cycle; reset if light persists beyond 3 minutes |
| All lights flashing simultaneously | Firmware or software glitch detected | Unplug for 5 minutes, remove reservoir, then full reset |
| “Prime” message on screen | Air in water line or reservoir seated incorrectly | Reseat reservoir; tilt machine side to side to dislodge air bubble |
Keurig’s support team notes that the “Prime” message is one of the most frequently misunderstood indicators. Many users assume the machine is broken when they see it, when in fact simply reseating the reservoir and running a water-only cycle resolves it in the overwhelming majority of cases. Always start with the simplest fix — the more complicated the troubleshooting, the more likely you are to overlook something basic that would have worked immediately.
Keurig Brewing Partial Cups or Tiny Amounts?
Sometimes the problem isn’t a total failure to brew — it’s a Keurig that delivers only a small trickle when you ask for a full cup. This partial brewing issue typically points to one of three causes: scale buildup partially blocking internal water flow, a clogged exit needle reducing output, or a weakening pump that can no longer maintain full pressure through the brew cycle.
Descaling fixes partial brews caused by scale in the vast majority of cases. If you’ve already descaled and the problem continues, try running three to five water-only brew cycles at the largest cup setting. This forces water through the entire system at maximum pressure and can dislodge partial clogs that the descaling solution didn’t fully clear on its own.
It’s also worth confirming that your brew size settings haven’t been accidentally changed. On some models, the default cup size can be bumped to a smaller setting without the user realizing it, resulting in consistently smaller-than-expected cups. Check the settings menu and confirm everything matches your intended brew size. If you use a reusable pod and grind your own beans, knowing the right amount of coffee grounds per cup will help you dial in consistent, full-flavored brews every time.
When Should You Consider Replacing Your Keurig?
Keurig machines are built to last three to five years with regular maintenance — though many users report machines running reliably for seven years or more when properly cared for. But there comes a point when continued troubleshooting stops making sense, especially when repair costs approach the price of a new machine.
Consider replacing your Keurig if any of the following apply:
- The machine is more than five years old and has never been descaled or regularly maintained.
- You’ve worked through all the troubleshooting steps in this guide and the machine still won’t brew.
- There’s visible damage to the water reservoir, housing, or any internal components you can see.
- The pump is making a grinding or high-pitched whining sound during attempted brew cycles — a strong indicator the pump motor is failing.
- The heating element is no longer reaching proper temperature, producing lukewarm coffee even at the highest heat setting.
Keurig’s warranty covers most manufacturing defects for one year from the date of purchase. If your machine is still within that window and experiencing persistent problems after troubleshooting, contacting Keurig support often results in a free replacement with minimal hassle. Outside of warranty, certified refurbished Keurig models are widely available at significantly lower prices than new units and offer solid value.
And if this whole experience has you wondering whether a pod machine is really the right fit for your coffee routine, that’s a completely fair question. Many coffee lovers discover they prefer manual brewing once they give it a real try — methods like French press brewing offer deep, full-bodied results that a pod machine genuinely can’t replicate.
Frequently Asked Questions About Keurig Not Brewing
Why is my Keurig not brewing even though it’s turned on?
A Keurig that’s powered on but won’t brew is almost always dealing with a water reservoir issue, an air bubble trapped in the water line, or a software glitch. Start by removing and firmly reseating the reservoir. Then tilt the machine gently side to side to dislodge any trapped air and try brewing again. If neither step works, unplug the machine for five full minutes, remove the reservoir during that time, reassemble, and attempt a fresh brew cycle after it warms up completely.
How often should I descale my Keurig?
Keurig recommends descaling every three months under normal household use. If you use unfiltered tap water or live in an area with particularly hard water, descale every six to eight weeks. Most machines will prompt you with a dedicated “Descale” indicator light when it’s time. Skipping descaling is the single most common reason Keurig machines fail prematurely — don’t wait for brewing problems to appear before you address it.
Can I use white vinegar instead of Keurig’s descaling solution?
Yes, white vinegar is an effective and significantly cheaper alternative to the branded descaling solution. Use equal parts white vinegar and water in the reservoir and follow the same descaling process. The key difference is the rinse phase — you’ll need to run 12 to 15 plain water brew cycles afterward to fully flush the vinegar scent and taste from the machine, compared to the standard 12 cycles for the branded solution. Be aware that using vinegar may technically void your warranty if your machine is still within its coverage period, so check your terms first.
Why is my Keurig only dispensing a small amount of coffee?
Partial brewing — where the machine runs but only produces a small trickle — is almost always caused by a clogged needle or significant scale buildup blocking the water flow path. Start by cleaning the upper and lower needles with a straightened paper clip, then run a full descaling cycle. Also check your brew size settings to confirm they haven’t accidentally been changed. If both fixes fail to restore full cup output, the internal pump may be weakening, which is a sign the machine may be nearing end of life.
How do I know if my Keurig needle is clogged?
The clearest signs of a clogged needle include: visible coffee grounds floating in your cup, a weak or uneven liquid stream during brewing, the machine making loud pumping sounds while producing little or no coffee, and K-Cups that appear incompletely punctured when you remove them — you can check this by looking at the foil top of a used pod. If you notice any of these signs, needle cleaning should be your first troubleshooting step. It takes about three minutes and resolves the issue immediately in most cases.
My Keurig is making noise but not dispensing any liquid — what’s wrong?
If your Keurig is running its pump loudly but no water is coming out, the most likely cause is an air lock — the pump is spinning but has no water to move through the system. Remove the water reservoir entirely, let the machine sit for one minute, then refill and firmly reseat the reservoir. Tilt the machine gently from side to side to shift any trapped air, then try a water-only brew cycle. In persistent cases, a full unplug-and-reset sequence clears the air lock completely.
How long should a Keurig last before I need to replace it?
A well-maintained Keurig typically delivers reliable performance for three to five years. Machines that are descaled on schedule, have their reservoirs cleaned weekly, and are used with filtered water regularly last seven years or more. The biggest factor in Keurig longevity isn’t how heavily you use it — it’s how consistently you maintain it. The three-minute weekly reservoir rinse and the quarterly descaling cycle are the two habits that make the greatest difference over the long run.
Get Your Keurig Back to Brewing — and Keep It There
Most Keurig brewing problems come down to maintenance gaps: scale that built up over months, a needle that never got cleaned, or a reservoir that sat slightly out of position. The fixes are almost always quick, cheap, and something you can handle yourself in a few minutes at the kitchen counter.
Work through the steps in order — reservoir first, then descaling, then needle cleaning, then a reset — and you’ll resolve the issue in the vast majority of cases without spending a dollar. Once your machine is brewing smoothly again, set a recurring reminder to descale every three months. That one habit does more for long-term machine health than any other maintenance step.
And if you want to get even more out of every pod you brew, the small tweaks — water quality, cup size calibration, and a clean needle — add up to a noticeably better daily cup. Bushy Beard Coffee has you covered for everything from troubleshooting to technique, so your next cup is always the best one yet.
—